Helen’s Orange Fruitcake

When Pearl told me about this recipe, I was a little skeptical: Orange slice candy in a cake? You may ask yourself the same question, but after making and eating this version of a holiday fruitcake, I am happy to recommend it.

I still prefer my Four in One Fruitcake, but Helen’s Orange Fruitcake is an excellent alternative for people who don’t like traditional fruitcake with lots of nuts and candied fruits. As one wit wrote, “It is a good fruitcake for people who don’t want any fruit in their fruitcake.” Of course, it does have dates, which are fruits.

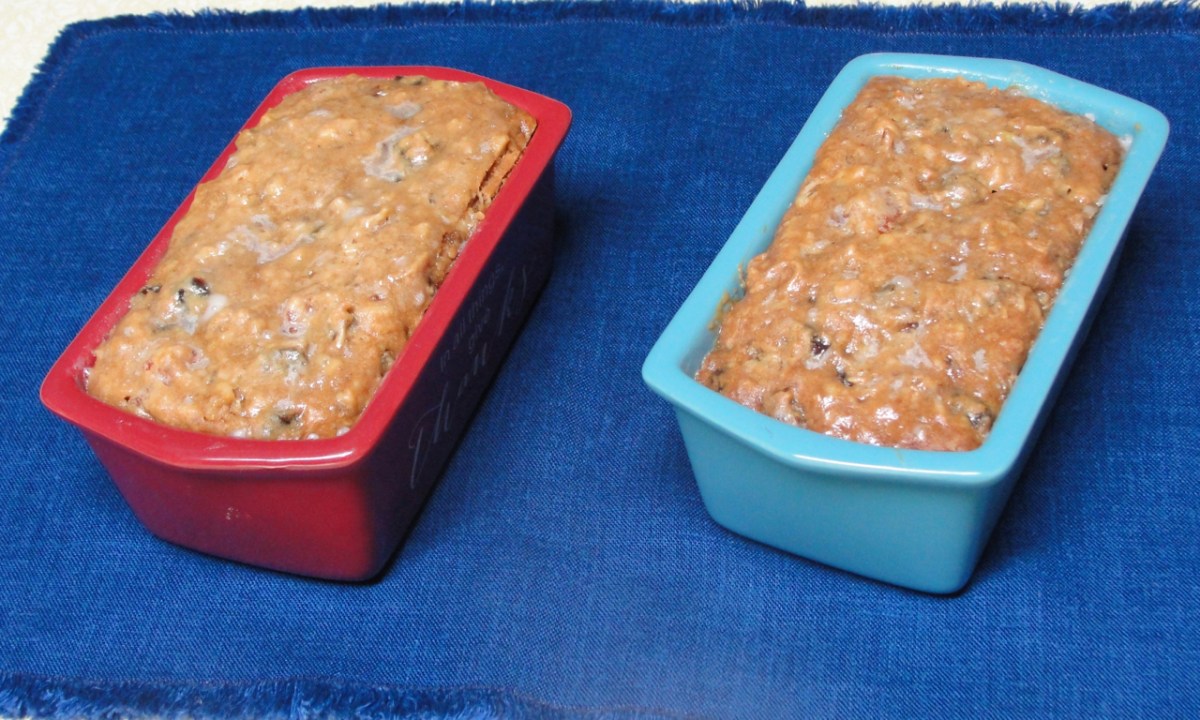
We liked the cake, but seemed a little dry to me. I wanted to make sure that I had not overbaked the smaller cakes, so I shared samples with three of our neighbors. They all said they thought it was delicious. After trying the cake I gave her, Pearl called to say that it was exactly like it was supposed to be.

If I can make it on the first try, so can you. Here how to do it.

INGREDIENTS:

For the cake:
1/2 cup shortening
1/2 cup butter
2 cups sugar
4 large eggs
1/2 cup buttermilk
4 cups all-purpose flour plus a little to help mix the fruit
1 tsp. baking soda
1/4 tsp. salt
1 lb. dates
1 lb. orange slices
1 cup flaked coconut
2 cups chopped walnuts or pecans

For the glaze:
1 cup orange juice (fresh or from frozen concentrate)
1 lb. powdered sugar (2 to 3 cups)

PROCEDURE:

Cream the butter and shortening with the sugar in a medium mixing bowl, then incorporate the eggs one at a time and stir in the buttermilk. Sift the flour and baking soda by cupfuls into the sugar and egg mixture to make a rather thick batter.

Preheat the oven to 225º and grease and flour three five by seven-inch loaf pans or more smaller loaf pans that will hold a total of about three and a half quarts of batter.

Chop the dates and nuts and orange slices fine. Put them in a large mixing bowl along with the flake coconut. Sprinkle with a little flour and mix to blend the ingredients evenly. Pour the batter over the fruits, candy and nuts and mix with your hands to blend all the ingredients.

Distribute the batter evenly into the three prepared pans and bake for three hours at 225º. If using smaller loaf pans, reduce the baking time and test for doneness with a toothpick inserted into the center of the smaller cakes after two hours. If the toothpick comes out clean, the cakes are done.

Shortly before the cakes are ready to come from the oven, make the glaze by mixing the orange juice and powdered sugar.

Take the cakes from the oven and allow them to cool slightly for five minutes. Pour the glaze evenly over the hot cakes and leave them in the pans until completely cool. Remove the cakes from the pans, wrap them with plastic film and refrigerate them for at least three days before serving.

NOTES: Pearl says that this is a very sweet but very good cake. Cut thin slices for serving. It is an old family recipe from her neighbor Helen.

You may need to add a little more buttermilk to get the batter to the right consistency. It should be thick but fluid enough to spread out over the dry ingredients as you scrape it into the bowl.

If you bought shredded rather than flaked coconut by mistake, don’t panic. Shredded coconut works just fine.

This cake continues to improve for at least two weeks. The last few slices we ate were delicious.

Grandma Rang’s Date Cookies

Families have different ways of celebrating Advent.  When I was growing up, one way we celebrated was by getting a Christmas tree.  Finding the tree was a man’s job, so each year Dad and I would head into the woods on the first or second Sunday of December.  

We would look at thousands of spruce and balsam trees and examine a hundred or more until we found the perfect one.  Then we would take it home so we could listen to complaints about bare spots and flat sides.

It was easier to take the criticism if we were eating one of Grandma Rang’s Date Cookies.  Baking those was one way my mother celebrated Advent, and they were Dad’s favorite cookie.   

They are one of my favorites too.  About twenty years ago, the tradition of these cookies was enriched for me  by a wonderful lady, Hazel Olson, who gave me a cookie cutter that had belonged to her husband’s grandmother.  It is a tinned steel cutter with fluted sides, a tool that was probably made sometime in the middle of the 19th century.  The handle is missing and the plating is worn off in a few places, but it works fine and feels good in my hand as I cut the rich dough.


Although you can eat them as soon as they are cool, these cookies are better after they have been stored in a tight container in a cool room for two or three days.  They keep fine for as many weeks.

INGREDIENTS FOR DATE FILLING:

1 cup dates

1 cup cold water

1 cup light brown sugar

Dash of salt

2 T flour

PROCEDURE:

Chop the dates fine and put them in a saucepan with the cold water, sugar and salt.  Heat to boiling and simmer until dates are tender, about fifteen minutes.  Stir frequently.  Mix the flour in a quarter cup cold water and stir into the dates.  Simmer another five minutes, stirring frequently. Remove from heat and cool before using as filling.  

INGREDIENTS FOR COOKIE DOUGH:

1 cup light brown sugar

1 cup white sugar

3/4 cup butter

3 large eggs

4 cups flour

1 tsp. baking soda

1 tsp. baking powder

1 tsp. salt

PROCEDURE:

Measure the sugar into a large mixing bowl. 

Cream the soft butter and sugar together.  Beat the eggs until lemon yellow and stir them into the sugar mixture.   Add the soda, baking powder and salt to the flour, and sift it into the sugar mixture about one cup at a time, stirring thoroughly between additions.  The dough should be very stiff.  Add a little more flour if necessary.  

Preheat the oven to 350º and grease the baking sheets.

Flour a large breadboard.  Take one-third of the dough, work it into a ball, place it on the breadboard, press it into a round pat about one inch thick, and turn it over, making certain that there is plenty of flour on the breadboard.  With a well-floured rolling pin, roll the dough to eighth of an inch thickness.  

Cut with a three or three and a half-inch round cookie cutter.  Put the rounds on a well-greased cookie sheet and put about a heaping teaspoon of date filling in the middle of each.  Top with more rounds and seal the edges by pressing them with your fingers.  Try not to make the cookie edges too thin.  

Bake in a 350º oven until the cookies are lightly browned, about ten to twelve minutes.  Cool on wax paper.

NOTES:

My mother’s recipe says to use a scant teaspoon of soda, baking powder and salt.  You can replace the  butter with oleo or with about a half cup of shortening, but the cookies are not as good.  Use a spatula to handle the rounds, as they are very tender.  The trimmings can be worked into the next third of the dough without harm.

Although you can eat them as soon as they are cool, these cookies are best after they have been stored in a tight container in a cool room for two or three days.  They keep fine for as many weeks.

The photo shows Grandma Rang’s Date-filled Cookies, Grandma Hopp’s Gingerbread Cookies and some Peppernuts.