Cindy’s Thai Chicken

This recipe traveled a long way to arrive in New Richmond, Wisconsin. It was brought here from southwest Asia by Cindy Pearson a few years ago, when her sister, Cathy, was serving as pastor of our church. Cindy was visiting her family in Wisconsin between academic terms at Charis Bible College in Hong Kong where she serves as director.

For many years Cindy has worked in China, teaching and caring for orphans before accepting her current position as a teacher and the director at the college. One Sunday she delivered a message during the worship service about her experiences in China. Following the service, she gave a slideshow about her work and life in Hong Kong. As good churchgoers, we ended the morning with a potluck.

Cindy brought a large platter of chicken and broccoli to the potluck. It was delicious, and when I asked for the recipe, she was gracious enough to email it to me. She called it Thai chicken and said that it was a popular dish with her friends in China. Chicken and broccoli are seasoned with a peanut sauce and broiled in the oven. It is actually a version of satay.

Food historians believe that satay was invented on the island of Java in Indonesia. Meat is skewered on palm frond ribs or bamboo skewers, cooked quickly over hot coals and served with peanut sauce. When we visited Surabaya, Indonesia, we saw many street vendors cooking satay. Rather than making this delicacy at home, people buy it from their favorite vendor and take it home to enjoy with rice.

In Cindy’s version, the chicken is dipped in the sauce and arranged on a baking sheet. Broccoli florets are scattered over the chicken and the remaining sauce is dribbled over the food in the pan.

Many years ago I hesitated to try any food cooked with peanuts (except for peanut brittle of course). However, once I was persuaded to do so by a college girlfriend who led me to a Chinese restaurant, I realized that I had been missing some delicious flavors. Be sure to use natural peanut butter for this recipe. Check the label before you buy a jar. The ingredients listed should be only peanuts and salt.

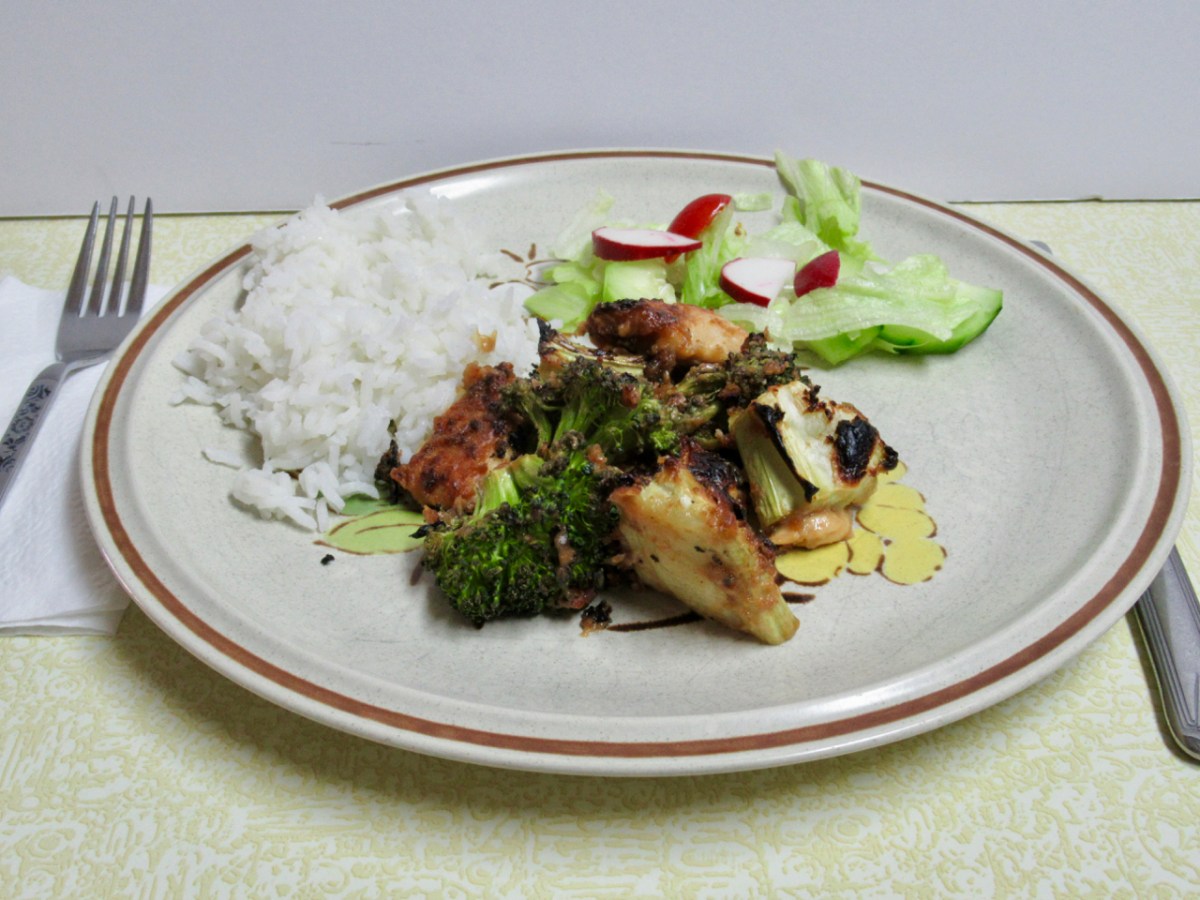
As you can see from the photo,Thai Chicken in pan closeup
, my first attempt at this dish resulted in what I thought was a bit too much charring, but as it turned out that just made the dish taste like it had been broiled over charcoal. Nothing tasted burned, the chicken was moist and tender, and everything was perfectly seasoned. You could lower the pan a little farther from the broiler if you wish, but we liked the dish just as it turned out.

Serve it with white rice and a little salad, and you will have a dinner low in carbohydrates and calories for guests careful about their diets.

INGREDIENTS:
2 chicken breasts (about 1 lb.)
1 bunch broccoli (about 1 lb.)
¼ cup + 2T creamy natural peanut butter
¼ cup low sodium soy sauce
1 T packed brown sugar
1 T sesame oil
1 T lime juice
½ T Sriracha sauce
½ T rice vinegar
1/8 cup warm water

PROCEDURE:

Start by making the sauce in a quart mixing bowl. Use a fork to blend the peanut butter, soy sauce, brown sugar, sesame oil, lime juice, Siracha sauce and vinegar. Add the warm water sparingly, beating the sauce until it is the consistency of rather thick gravy.

Line a shallow baking pan with aluminum foil or parchment paper and start the oven broiler. Pat the chicken breasts dry and cut them into pieces no thicker than one inch. Dip the chicken pieces into the sauce and lay them out on the pan.

If you plan to serve the chicken immediately, this is a good time to start cooking the rice.

Wash and break or cut the broccoli into florets about the same size as the pieces of chicken. Distribute the broccoli between the chicken pieces and dribble any leftover peanut sauce over the meat and broccoli. Put the pan under the broiler for six to eight minutes. Turn the meat and broccoli and broil another six to eight minutes or until the meat is done.

Serve hot with rice.

NOTES: Cindy suggests that Thai chicken is just as good refrigerated and reheated in your microwave to serve later and that you can make four batches as easily as one.

If you don’t have any Sriracha sauce in your pantry, you can substitute any other good hot sauce, though the flavor may change a little.

Bill Clinton’s Lemon Chess Pie

I was squeezing lemons to get the juice for a lemon chess pie when I was reminded of helping squeeze oranges and lemons for my mother. Before the days of frozen concentrates in cans at the Co-op or A & P, if you wanted orange juice or lemonade you did what Mom and Dad did. You bought oranges or lemons, took them home and squeezed them in your kitchen.

Oranges and lemons were expensive, so a glass of orange juice on a winter morning was a real treat. We each got a small glass once or twice a month. After juicing the oranges, my mother soaked the pulp in some water and added it with a little sugar to make the juice go further. The result was what something like orangeade and we loved it.

Lemonade replaced orange juice in the summer, and we enjoyed some almost every week. The juice from three or four lemons could make a half gallon of lemonade complete with slices of lemon rind floating with the ice cubes. Perhaps Mom’s lemonade would not satisfy a gourmet, but we all loved it, especially on hot evenings when the mosquitoes drove us indoors to a house that felt like an oven.

As I pressed and turned the halves of three small lemons on the ridged glass cone in the center of what is technically called a juice reamer, I flashed back to how I did the same thing nearly seventy years ago at the kitchen counter next to the sink. I think that the only difference is that Mom’s juicer (or reamer) was made of pale green glass while ours today is clear.

You can still buy juicers like ours, probably because they are dependable and inexpensive. If you need to juice a lot of fruit, they are not for the weak of arm, but for making a half gallon of lemonade or getting a quarter cup of lemon juice for chess pie, they are more than adequate and work well even if the electric power goes off on a hot day and the air conditioner fails.

There are many different recipes for lemon chess pie. Like all chess pies, the ingredients include fresh lemon juice, eggs, sugar, butter and cornmeal or flour or both. Chess pies are usually thought of as a southern specialty, but there are variations from northern states as well. Mildred Jorgensen, who gave our children piano lessons and was organist at St. Luke’s Lutheran Church in New Richmond for many years, gave us a cookbook from the Cedarhurst mansion in Cottage Grove, Minnesota, that includes a recipe for lemon chess pie.

The recipe below produces a richer pie with a more lemony flavor than most lemon chess pies. That is probably why it is said to be Bill Clinton’s favorite chess pie.

Like all chess pies, it is really easy to make.

INGREDIENTS:

2 cups granulated sugar
1/2 cup salted butter
5 large eggs
1 cup milk
1 T all-purpose flour
1 T yellow cornmeal
1/4 cup freshly squeezed lemon juice
The zest from two or three lemons (2 – 3 T)
1 nine-inch unbaked pie shell

PROCEDURE:

Begin by lining a nine-inch pie plate with a crust. You can make your own with this recipe for plain pie crust or use a commercial crust.

Bring the butter, eggs and milk to a warm room temperature. I microwave the butter under low power until it begins to soften, heat the milk at full power for a minute or so and put the eggs in a bowl of warm water.

Next, juice and zest the lemons. You will need two or three lemons, depending on the size. Remove the zest from the lemons with a zester or a kitchen grater and strain a quarter cup of juice. Set the zest and juice aside.

Preheat the oven to 350º.

Measure the sugar into a large mixing bowl and add the softened butter. Cream the butter and sugar with a wooden spoon until they are light and fluffy. Beat in the eggs one at a time, then stir in the milk.

Add the flour, cornmeal, lemon juice and zest and beat at medium speed for a minute with an electric mixer.

Pour the filling into the crust and bake on a center shelf for forty to fifty minutes. Use a table knife to check for doneness. Insert the knife near the center of the pie at forty minutes. If the knife comes out clean the pie is done. If not, bake another six or seven minutes and check again.

Let the pie cool completely before serving. Cut small slices as this is a very rich pie. If a diner asks for more, you can always relent with another small slice.